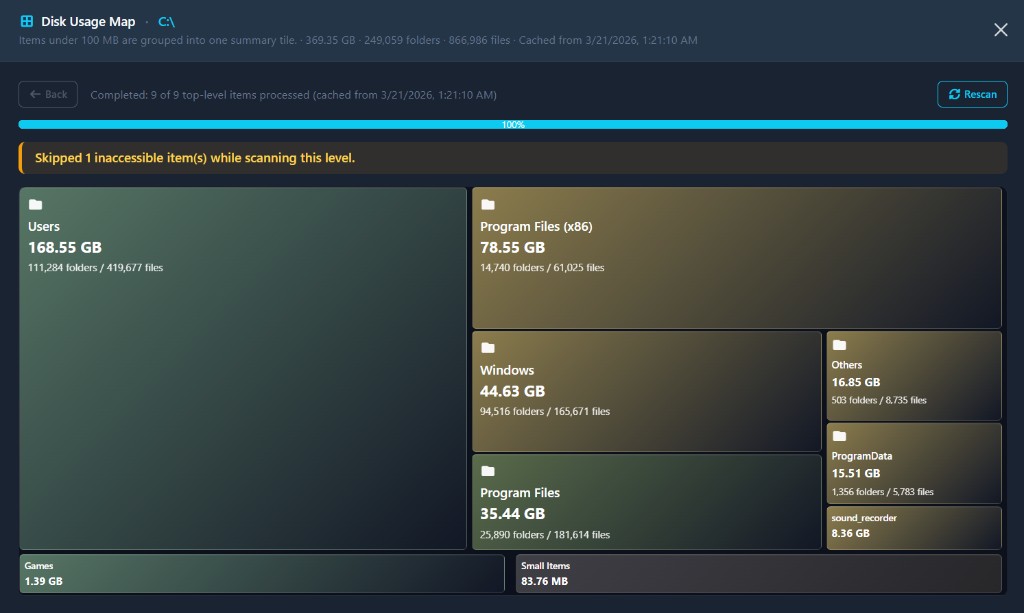
A disk usage map turns storage into a picture so you can stop guessing and start reclaiming space quickly. Use it to identify the largest categories first, then apply the safest cleanup method for each category.
This guide avoids “example folder name” advice and focuses on actions that are reliable across real-world Windows endpoints.
Answer first
A disk usage map is a visual breakdown of storage usage where larger blocks represent areas consuming more space, helping you prioritize investigation and safe cleanup in minutes.
Quick steps
- Re-scan and note the top 3 largest blocks on the map.
- Drill down one level to identify what’s actually large (files vs apps vs system-managed data).
- Start with user-owned content (removable data and supported app cache cleanup).
- Remove installed software via uninstall workflows (don’t delete app directories).
- Use built-in OS cleanup for temporary/system-managed files.
- Re-scan after each pass and confirm the largest block shrank.
- If the scan reports inaccessible items, plan a second pass with appropriate permissions.
Key takeaways
- Biggest block first is the fastest path to meaningful savings.
- Prioritize user-owned and uninstallable space before system-managed areas.
- Avoid manual deletion in system-managed locations—use supported cleanup methods.
- Re-scan to verify impact and avoid spending time on changes that don’t move the needle.
Table of contents
- Prerequisites
- Step-by-step: how to use a disk usage map
- Cleanup decision table (safe first moves)
- Verification (how to confirm it worked)
- Common pitfalls
- Preventing repeat fill-ups
- FAQ
- Next step
Prerequisites
Before you delete anything, capture these basics:
- Which drive is impacted (system drive vs data drive).
- Whether this is a one-off device or a pattern across multiple endpoints.
- Whether the user/device has any retention expectations (business records, project archives, etc.).
If you support fleets, decide your “good enough” goal up front (for example: keep at least 15–25% free space, or a fixed minimum like 20–50 GB depending on device class).
Step-by-step: how to use a disk usage map
- Start with the biggest blocks. The largest areas are where you’ll get real space back.
- Drill down one level. Your goal is to identify whether the space is:
- User-owned files
- Installed applications
- System-managed files
- Unknown/mixed content
- Pick the lowest-risk cleanup path for that category (see table below).
- Make one change at a time, then re-scan so you know what worked.
- Stop when you’re safely above your free-space threshold, not when the drive is “perfectly clean.”
Cleanup decision table (safe first moves)
| Large block type | What it usually is | Safest first moves | What to avoid |
|---|---|---|---|
| User-owned data | Downloads, media, archives, duplicates, work artifacts, supported app caches | Remove/archive obvious large files; dedupe; reduce caches using the app’s own settings | Deleting unknown content “just to test” |
| Installed applications | Desktop apps, toolchains, launchers, optional components | Uninstall unused apps; remove old versions via supported uninstallers | Manual deletion of app directories |
| System-managed temporary files | OS temp, recycle bin content, update leftovers | Use built-in cleanup tools and policies (e.g., Storage Sense) | Manual deletion inside system-managed internals |
| Shared app data | Shared caches, local databases, vendor-managed data | Adjust retention in the owning app; purge via supported app tooling | Guessing what’s safe based on file/folder names |
| Unknown / mixed | Tool “other” groupings, miscellaneous categories | Drill down until you can identify the source | Bulk deletions without identification |
Verification (how to confirm it worked)
After each cleanup pass:
- Re-scan and confirm the same large area actually shrank.
- Confirm free space is above your operational minimum.
- If you’re supporting fleets, log:
- Which category caused growth
- What action fixed it
- What policy prevents recurrence
Common pitfalls
- Treating the map like a delete list. It’s an investigation tool; actions depend on ownership and supported cleanup methods.
- Deleting installed app folders manually. This can break repair/uninstall paths and create worse leftovers.
- Chasing small items early. Tiny files rarely matter compared to one or two large blocks.
- Ignoring inaccessible items. It means the picture may be incomplete; re-check with appropriate access.
Preventing repeat fill-ups
- Set a cadence: monthly scan + cleanup (or after patch cycles).
- Standardize where large artifacts live and how long they’re kept.
- Enable automated hygiene where appropriate (temporary files cleanup policies).
- Track “top storage growth categories” so fixes become policy—not heroics.
FAQ
What is a disk usage map?
A disk usage map is a visual breakdown of storage where larger blocks represent areas consuming more space, helping you prioritize cleanup quickly.
How do I use a disk usage map without breaking anything?
Start with user-owned data and uninstallable applications, use built-in cleanup for system-managed files, and avoid manual deletion in system-managed locations.
Why do disk usage maps show huge “unknown” or “other” blocks?
Many tools group mixed categories until you drill down. Treat it as a prompt to investigate, not an instruction to delete.
Is a disk usage map accurate if it shows inaccessible items?
It’s usually directionally useful, but incomplete. Plan a second pass with appropriate permissions before drawing strong conclusions.
What’s the fastest way to reclaim space once I find the biggest block?
Choose the cleanup path that matches the category: delete/archive user-owned content, uninstall apps, or use built-in cleanup for system-managed files—then re-scan to verify.
Next step
- Run a cleanup pass in this order: user-owned content → uninstall unused apps → built-in OS cleanup → re-scan.
- Turn what you learned into a repeatable checklist so low-disk incidents don’t keep resurfacing.